前提是需要最起码的基础,能编辑文本文件。别抄错命令就行了。可能大家的Linux的章节不太一样,我先写我课程里有的,如果有不一样的可以私信我,把步骤发给我,我添加在这篇文章里。方便大家。由于是本人亲自编写(至少后面的大题是我整理的),所以可能会有漏的,欢迎提出改进方案,我后面再改。大学勾八Linux课程还要用头歌完成实验,做一下教程,以供大家借鉴,严禁照抄照搬,有的需要理解意思之后才能够完成。
第一章 Linux介绍
1
cd /ls -atouch newfilemkdir newdircp newfile newdir/newfileCpyman 3 fopen第2章Linux用户管理
2
Linux之用户管理
useradd -m newUseruserdel -r oldUsercd /home/newUserpwd#!/bin/bash#创建newUser新用户#***********begin*************#useradd newUser#************end**************##在符号<<前输入设置用户密码的命令(命令与<< EOF保持在同一行), 密码输入在下一行,确认密码输入在下下行#例如:#command << EOF#password#password#EOF#***********begin*************#passwd newUser << EOF11EOF#************end**************##!/bin/bash#创建newUser新用户#***********begin*************#useradd newUser#************end**************##在符号<<前输入设置用户密码的命令(命令与<< EOF保持在同一行), 密码输入在下一行,确认密码输入在下下行#例如:#command << EOF#password#password#EOF#***********begin*************#passwd newUser << EOF11EOF#************end**************##使用su命令切换当前用户身份为newUser,并且执行whoami指令,然后恢复原来的身份;#提示使用su命令的-c参数完成#***********begin*************#su -c whoami newUser#************end**************#Linux之用户高级管理
#!/bin/bash#在以下部分写出完成任务的命令#***********begin*************#groupadd newGroupgroupadd -g 1010 newGroupIDgroupdel oldGroup#************end**************##!/bin/bash#在以下部分写出完成任务的命令#***********begin*************#useradd newUserusermod -a -G oldGroup newUser#************end**************##!/bin/bash#在以下部分写出完成任务的命令#***********begin*************#usermod -l newName oldNameusermod -d /home/newName newNamegroupmod -n newGroup oldGroup#************end**************#第3章Linux存储系统
1
Linux之硬盘管理
A CC ACD AC BAADABC第4章Linux文件/目录管理
4
Linux 文件/目录管理
#!/bin/bash#在以下部分写出完成任务的命令#***********begin*************#touch file1touch file2rm oldFile1 oldFile2#************end**************##!/bin/bash#在以下部分写出完成任务的命令#***********begin*************#mkdir newDir1 newDir2rmdir oldDir1rm -r oldDir2#************end**************##!/bin/bash#在以下部分写出完成任务的命令#***********begin*************#cp file1 Dircp file2 Dircp file1 Dir/file1Cpymv file3 file4 Dirmv file5 file6#************end**************##!/bin/bash#在以下部分写出完成任务的命令#***********begin*************#cp -r Dir1 Dir2 Dircp -r Dir1 Dir/Dir1Cpymv Dir3 Dir4 Dirmv Dir5 Dir6#************end**************##!/bin/bash#在以下部分写出完成任务的命令#***********begin*************#cat file1head -n 5 file2tail -n 5 file2ls -a /home#************end**************#Linux文件/目录高级管理一
#!/bin/bash#在以下部分写出完成任务的命令#***********begin*************#chmod u=x oldFile1chmod g-w oldFile2chmod o+x oldFile3chmod a=r oldFile4chmod g=w oldFile4chmod o=x oldFile4#************end**************##!/bin/bash#在以下部分写出完成任务的命令#***********begin*************#chmod u=x oldDir1chmod g-w oldDir2chmod o+x oldDir3chmod u=r,g=w,o=x oldDir4chmod -R u=r,o=x,g=w oldDir5#************end**************##!/bin/bash#在以下部分写出完成任务的命令#***********begin*************#chown oldUser oldFilechown oldUser oldDir1chown -R oldUser oldDir2#************end**************##!/bin/bash#在以下部分写出完成任务的命令#***********begin*************#chgrp oldGroup oldFilechgrp oldGroup oldDir1chgrp -R oldGroup oldDir2#************end**************#Linux文件/目录高级管理二
#!/bin/bash#在以下部分写出完成任务的命令#*********begin*********#du -h oldFiledu -a oldDir#********* end *********##!/bin/bash#在以下部分写出完成任务的命令#***********begin*************#ln oldFile oldFileHardLinkln -s oldFile oldFileSoftLinkln -s oldDir oldDirSoftLink#************end**************#Linux文件/目录高级管理三
#!/bin/bash#在以下部分写出完成任务的命令#***********begin*************#chmod u+x,u+s oldFile1chmod g+s oldDir1chmod u-s oldFile2chmod g-s oldDir2#************end**************##!/bin/bash#在以下部分写出完成任务的命令#***********begin*************#chmod o+t oldDir1chmod o-t oldDir2#************end**************##!/bin/bash#在以下部分写出完成任务的命令#***********begin*************#chattr +i /root/oldFile1lsattr /root/oldFile2chattr -i /root/oldFile3#************end**************#第5章Linux压缩和归档文件
1
Linux之文件打包和解压缩
#!/bin/bash#在以下部分写出完成任务的命令#*********begin*********#tar -cvf newFile.tar oldFile1 oldFile2tar -xvf oldFile.tar#********* end *********##!/bin/bash#在以下部分写出完成任务的命令#*********begin*********#tar -cvf newFile.tar.gz oldFile1 oldFile2bzip2 oldFile.tarzip oldDir.zip oldDir#********* end *********##!/bin/bash#在以下部分写出完成任务的命令#*********begin*********#tar -xvf oldFile.tar.gzbunzip2 oldFile.tar.bz2unzip oldDir.zip#********* end *********#第6章Linux文件定位命令
1
Linux之文件/目录搜索
#!/bin/bash#在以下部分写出完成任务的命令#*********begin*********#locate -c grouptouch newFileupdatedblocate newFile#********* end *********##!/bin/bash#在以下部分写出完成任务的命令#***********begin*************#which useraddwhereis useraddwhereis -m useradd#************end**************##!/bin/bash#在以下部分写出完成任务的命令#***********begin*************#find -name "*.conf"find -name "my*"find /root -size +1Mfind /root -name "*Link" -type l -exec ls -l {} \;#************end**************#第7章Linux远程联机服务
2
Linux 远程联机服务(一)- Telnet服务器
这个已经有人提供教程了,我就不详细解答了 Telnet服务器
Linux 远程联机服务(二)- Rsh服务器
Rsh服务器
第8章Linux网络实战
4
Linux网络实战(一)- DNS配置
vim /etc/hosts把下面添加到尾部127.0.1.1 newLocalhost127.1.1.1 www.baidu.comapt-get updateapt-get install bind9service bind9 startDNS配置 文件是可以复制的,记得删除行号,保留格式,可以参考对应头歌里的教程。
Linux网络实战(二)- WWW服务器搭建
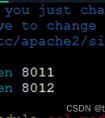
apt-get updateapt-get install apache2service apache2 startvim /etc/apache2/ports.conf #把80替换为8011vim /etc/apache2/sites-enabled/000-default.conf @#把80替换为8011vim /etc/apache2/ports.conf #添加一个端口
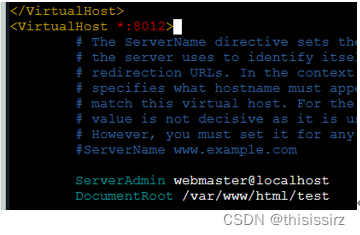
vim /etc/apache2/sites-enabled/000-default.conf #添加一个一模一样的xml文本体,端口叫8082#并把文档目录修改为/var/www/html/test 如下图所示。
mkdir /var/www/html/testtouch /var/www/html/test/index.htmlservice apache2 restartLinux网络实战(三)- Samba服务器搭建
apt-get updateapt-get install samba#建议密码设置为123456apt-get install smbclientuseradd testUsersmbpasswd -a testUsertouch testFilevim /etc/samba/smb.conf #在文件尾部添加如下文本 “[ homes]comment = smbclient homespath = /tmpbrowseable = nowritable = yescreate mask = 0664directory mask = 0775”service samba startsmbclient //127.0.0.1/testUser -U testUser%123456smb: \>mkdir Dirsmb: \>put /root/testFile /Dir/upLoadFilemkdir /testDirchmod 777 /testDiruseradd testUsersmbpasswd -a testUser(输入新设置的密码123456)touch testFilevim /etc/samba/smb.conf #在文件尾部添加如下文本 "[TestShare]comment = this is my homeworkpath = /testDirbrowseable = yeswritable = yescreate mask = 0644directory mask = 0755"service samba restartservice smbd restartsmbclient -L 127.0.0.1 -U testUser%123456 #如果下方有TestShare字样则为成功。smbclient //127.0.0.1/TestShare -U testUser%123456(注意:这里的用户是一次性的,每次使用这个连接命令都会使这个用户消失,如果要重新连接,需要新建用户。还要注意文件,也是一次性的,上传之后原文件会消失,若使用过,则需要重新创建)smb: \>mkdir Dirsmb: \>put /root/testFile /Dir/upLoadFileLinux网络实战(四)- FTP服务器搭建
apt-get updateapt-get install vsftpdapt-get install ftptouch testFileservice vsftpd startvim /etc/vsftpd.conf #在文件尾部添加如下文本 "anon_root=/anon_other_write_enable=YESanon_umask=022anon_upload_enable=YESwrite_enable=YESanon_mkdir_write_enable=YES"#并将vsftpd.conf文件中 anonymous_enable 设置为 YES (vim下使用 /anonymous_enable 可以快速找到位置)service vsftpd restartftp localhostanonymous回车cd /tmpmkdir Dirsend /root/testFile ./Dir/upLoadFileexitservice vsftpd restartuseradd -m newUserpasswd newUser密码123456touch testFilevim /etc/vsftpd.conf #将vsftpd.conf文件中pam_service_name对应的值改成 ftpservice vsftpd restartftp localhostnewUser123456smb: \>put /root/testFile ./upLoadFilesmb: \>exitservice vsftpd restart


